The Lime - Exhaust Replacement


I bought the Westy with the foreknowledge that there was a minor exhaust manifold leak, causing a leaning of the mixture and backfiring. Being familiar with type 1 engines I thought very little of it - other than the backfiring, the van sounded fine! Well, I got a safety certificate, which was a minor miracle in itself... Because when I got the van home and checked it over I found a plethora of problems in the exhaust system!
First of all, the worst part is that other than the eliminator style exhaust that was on the van when I purchased it, it retained its stock style exhaust. Vans produced from '72 - '74 had a simpler exhaust system where the exhaust manifolds were part of the heat exchangers, which led directly into the exhaust. The '75 - '78 vans (mine included) have a very complex system that consists of two different exhaust manifolds, two 180 degree u-pipes and heat exchangers. From there on my system was replaced with an eliminator exhaust, but original vans still had a 90 degree elbow, a crossover pipe, a catalytic converter, a muffler, and a tail pipe!!!
Secondly, when I examined the current system I found poorly repaired and unrepairable rot in the muffler itself - no biggie. I also found that the U-pipes on the van were very worn and severely leaking (see picture above - note the thin flanges), and worse yet, the exhaust manifold was leaking (see the carbon traces in the picture above). Removal of the parts and further examination ensued. Basically I deemed that the U-pipes and one manifold were unrepairable. I eventually sourced good used U-pipes and a used manifold that needed a repair. I also ordered a BUGPACK header and quiet pack system (recommended by two sources as the best of the cheap exhausts) from www.cip1.ca. Since my heater boxes were relatively new (and they're in the magnitude of $300 each) it didn't make sense to convert to the older style of exhaust, since new heater boxes and engine tin would be required.
Though the manifolds are made of stainless and cast iron I was able to find a setting on my mig welder that yielded good penetration on both parts. I spent quite a bit of time repairing and strengthening both, including building up the flanges with weld.
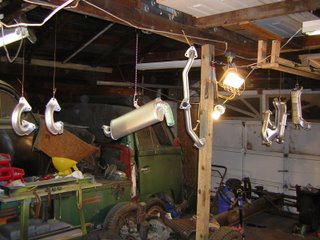
Next I sandblasted everything, including the new parts, since they are shipped only with a rust-preventative paint that can't handle heat. Once sandblasted I hung everything and sprayed them with POR20 high temperature paint I purchased locally from http://www.tgfbumper.com/. This product has mixed reviews on the 'net, but was the only high temperature product I could find that can handle 1200 degrees F plus and is a non-aerosol. The aerosol solutions usually don't last too long.
Once two thin coats were applied 24 hours apart I was ready to install everything.
The first step was removing the old copper seals from the heads, which was a rather difficult job. I wound up bending a jewelers straight-blade screwdriver and using it as a tiny prybar. Once out I cleaned the mating surface of the head. Then I moved into the garage and laid some 100 grit sandpaper on a flat work surface. I used this paper to make sure both mating surfaces on each manifold was filed perfectly flat. Next I used a propane torch, following the instructions on www.ratwell.com and annealed the new copper sealing rings. Did you know that normally the copper will make a ringing sound when dropped on concrete, but once annealed will make a dull clunk? Neat! Anyway, this process softens the copper so it seals better. Once annealed I installed the manifolds onto the engine and torqued the self-locking copper nuts down using my brother's torque wrench to 18 foot pounds.
The rest of the process is just the reverse of removal, with new hardware. 21 8mm bolts, washers, lock washers, and nuts, sweat, tears, and some blood.
Check out the pictures.. It was all worth it. Oh, and it sounds good too! Plugging the exhaust tip with a rag stalls the engine in a few seconds - no leaks!
My initial concerns about the low hanging header system are gone - it leaves just enough room under the bumper for a hitch!! See that in an upcoming post!

<< Home